{% static %} handles more than you think


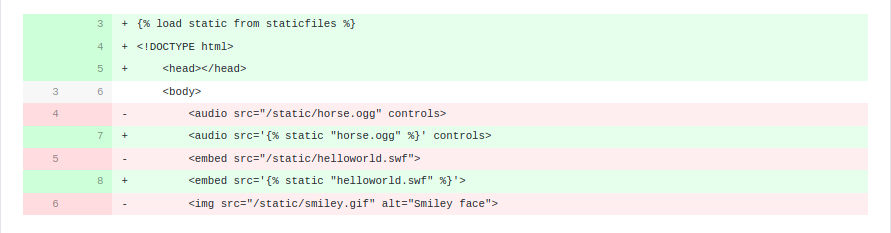
You probably agree using {% static %} is not a controversial:

Credit: Django Doctor

If you’re unfamiliar: {% static %} returns the path the browser can use to request the file. At it’s simplest, that would return a path that looks up the file on your local file system. That’s fine for local dev but in prod we will likely use third-party libraries such as whitenoise or django-storages to improve performance of the production web server.

There are reasons other than “because S3” for why we use {% static %}

File revving

Whitenoise has a storage backend STATICFILES_STORAGE that performs file revving for cache busting. As a result the file path rendered in the template is renamed: script.js may be renamed to script-23ewd.js. The STATICFILES_STORAGE generates a hash from the file’s contents and renames the file and generates a manifest file that looks like:

{ 'scripts.js': 'scripts-23ewd.js'}

This is called revving. {% static ‘script.js’ %} renders 'script-23ewd.js' in the template because 'script.js' is looked up in the manifest, resulting in 'script-23ewd.js' being resolved.

This is for cache busting: when the file content change the file name changes too, so a revved file can have cache headers set to cache forever in the CDN or browser. On the next deployment if the file contents changes so too does the file name being requested and thus the most up to date file is retrieved by the browser.

So {% static %} abstracts away cache-busting mechanisms so we can focus on templatey things in the template instead.

Websites can move house

Given enough time a website can change where it’s served from:

  • From subdomain to path: abc.example.com to example.com/abc/ and xyz.example.com to example.com/xyz/. This has happened in a project I was in for SEO reasons.
  • Merging multiple repositories into one. This happened to a few projects I was involved with to make development more efficient.

At this point it would be unclear which app’s files are served from /static/. Yes a developer can find a replace all of /static/ with /abc/static/ and /abc/static/. But if {% static .. %} was used they would not need to.

So {% static %} prevents Javascript and CSS from breaking because where the website is served from changed.

Serving from S3

Django suggest not serving static files from the web server in production. One way to do that is to serve the files from S3. If STATICFILES_STORAGE serves from S3, then the static domain will likely be different from webserver domain unless some configuration in Cloudfront ensures otherwise.

So in that case using {% static ‘script.js’ %} ultimately renders https://s3-example-url.com/script.js instead of /static/script.js.

So {% static %} handles changes in the domain the files are served from.

Do you {% static %} everywhere you should?

You can check if your codebase at django.doctor. It check missing {% static %} and other Django code smells:

If you want to avoid code smells getting into your codebase in the first place install the GitHub PR bot to reduce dev effort and improve your code.

Alexa Brower Client – Talk to Alexa from your desktop, phone, or tablet browser.

I made a pluggable Django app that allows you to talk to Alexa through your browser:

  1. Add ​​​​​alexa_browser_client to your INSTALLED_APPS
  2. Run the Django app ./manage.py runserver
  3. Go to http://localhost:8000/alexa-browser-client/
  4. Say something interesting to Alexa e.g., “Alexa, What time is it?”

waiting

listening

And hear Alexa’s answer through your browser,

Buy why?

  1. It’s like the Amazon Echo, but web developers can build a rich web app around it – and that web app can be used on your Desktop, Tablet, Smartphone, or Smart Watch.
  2. You can change the wakeword to anything you want. e.g., “Jarvis“.
  3. You can be 100% certain that Amazon, CIA, or “Russian Hackers” are not always listening: the Alexa code does not fire up until the “Alexa” wakeword is issued.
  4. Voice control is an important technology, and will only become more relevant. 11 Million households now have an Alexa device, 40% of adults now use voice search once per dayCortana now has 133 million monthly users. If you’ve not started yet, it’s worth getting into voice technology to stay relevant.

So Alexa Browser App is a tool for developers to build voice commands into their web apps. The only limit is yourself.

Next Steps

I will be using Alexa Browser Client to build a rich web app for controlling my smart home devices. I will put cheap Android tablets in each room, and the web-app will be loaded on each tablet.

Has someone knocked on the door? “Alexa, ask the house to video chat with the front door”

Want to view your Google Calendar? “Alexa, ask the house to show my calendar”.

Want to view the traffic situation in Google Maps? “Alexa, ask the house to show my commute”.

80% of being married is shouting “What did you say?” to your spouse in another room. No more: “Alexa, ask to the house to video chat with the kitchen”.

Note in the above examples you would need to create a custom Alexa Skill that reacts to “the house” and routes the command to your smart home controller app.

Contribute

Alexa Browser Client has great test coverage, highest Codeclimate score, and Gemnasium integration – but the library does not yet support all the Alexa Voice Service features. Feel free to make a Pull Request to add features. As a community, we can make a fully-featured customizable open-source Echo alternative in the browser.

Tell browser when files are updated (per-file cache busting)

This post will explain a simple method to tell the browser to re-download a file when the file has changed.

The problem

A common approach to cache busting when files are updated is to automatically add a “build label” to the url – maybe using requireJs‘s `urlArgs`

require.config({
    urlArgs: "build={{build_id}}",  //adds ?build=... to each request
    ...
});

When my_file_1.js is requested, the build will be added to the url:

/static/my_file.js?build=19

This is fine if all the code is in a single javascript file but a problem arises when the code is split into smaller files. We have 30 files used in our web site:

/static/my_file_1.js?build=19
/static/my_file_2.js?build=19
...
/static/my_file_30.js?build=19

Later we update “my_file_1.js”, and therefore the build label is also updated, so this happens:

/static/my_file_1.js?build=20
/static/my_file_2.js?build=20
...
/static/my_file_30.js?build=20

Now 1 file updated but the browser re-downloads all 30 files because the build label changed. 97% of the files have now been needlessly re-downloaded. This will slow down page loads compared to if we only re-download changed files. This problem gets larger if continuous integration is used with many pushes to production each day. Moreover, we also force re-download of any third party libs in use. Performance will surely suffer.

A solution

Instead of using build label for cache busting we will extend requireJs to use the commit hash of the last times each individual file was changed (note: this bit is quite hacky. If anyone has a smarter way to do it then I will update):

require.config({...});
requirejs.s.contexts._.realNameToUrl = requirejs.s.contexts._.nameToUrl;
 requirejs.s.contexts._.nameToUrl = function() {
    var url = requirejs.s.contexts._.realNameToUrl.apply(this, arguments);
    if (hashes[url]) {
        return url + '?hash=' +hashes[url]; 
    }
    return url
 }

Before we an use this code we need to create a file containing file paths and the commit hashes, a file that looks like this:

var hashes = {
    "/static/my_file_1.js": "28c72d56",
    "/static/my_file_2.js": "8e4e7740",
    ...
    "/static/my_file_30.js": "28c72d56" 
};

I made a django app that does this (here) . If you’re not using Django then fork the repo and make it work in your environment.

The outcome

See the hashes are added to the static file requests.

Usage in production

We can manually call the script to update the file containing commit hashes and add the resulting file to version control. Thats fine. However, I’m quite forgetful  and forgetting to run the script will result in the browser using old files. As I use ansible for provisioning my servers I just add the following to my ansible script:

- name: getting cache bust hashes
 django_manage: >
     app_path="my/repo/"
     command=collect_static_hashes
     settings=settings.live
     virtualenv="my/virutalenv"

And it just works.

Caution

  • If you update your static files using git commit –amend then the commit hash will not change.
  • The hack to requirejs will not work if you have multiple contexts in play.

JSON schema validation with Django Rest Framework

Django Rest Framework integrates well with models to provide out of the box validation, and ModelSerializers allow futher fine-grained custom validation. However, if you’re not using a model as the resource of your endpoint then the code required for custom validation of complex data structure can get hairy.

If there is a heavily nested data structure then a serializer can be used that has a nested serializer, which also has a nested serializer, and so on – or a JSON schema and custom JSON parser can be employed.

Using a JSON schema generation tool also provides a quick win: generate the canonical “pattern” of valid JSON structure using data known to be of the correct structure. This post will go through doing this JSON schema validation using Django Rest Framework.

Note my folder structure is like so:

apps/
    products/
        api/
            parsers.py
            negotiators.py
            schemas.py
            urls.py
            views.py

Usecase

If you find yourself in the following situations then this approach should come in useful:

  • Storing data from external service when you don’t have control over schema and don’t want to replicate it in a database.
  • Data not related to a specific resource.
  • Endpoint for saving data serialized from taffy.
  • Need to store data in flat file instead of database due to a technical constraint.

JSON Schema

We will validate the JSON posted to out endpoint against a JSON schema we define. The JSON schema standard is not yet finalized, but in a mature enough for our usecase. This example uses the jsonschema python package, and the following data:

Note for sake of briefity the example data structure below is simple, but just pretend its complex. If the data structure was as simple as bellow a serializer should be used.

# schemas.py
json = {
    "name": "Product",
    "properties": {
        "name": {
            "type": "string",
            "required": True
        },
        "price": {
            "type": "number",
            "minimum": 0,
            "required": True
        },
        "tags": {
            "type": "array",
            "items": {"type": "string"}
        },
        "stock": {
            "type": "object",
            "properties": {
                "warehouse": {"type": "number"},
                "retail": {"type": "number"}
            }
        }
    }
}

# The JSON Schema above can be used to test the validity of the JSON code below:
example_data = {
    "name": "Foo",
    "price": 123,
    "tags": ["Bar", "Eek"],
    "stock": {
        "warehouse": 300,
        "retail": 20
    }
}

For an easy look at validation in practice take a look here

Endpoint

Now to the impliment the DRF endpoint that uses JSON schema validation:

# views.py
from rest_framework.exceptions import ParseError
from rest_framework.response import Response
from rest_framework import views

from . import negotiators, parsers, utils


class ProductView(views.APIView):

    parser_classes = (parsers.JSONSchemaParser,)
    content_negotiation_class = negotiators.IgnoreClientContentNegotiation

    def post(self, request, *args, **kwargs):
        try:
            # implicitly calls parser_classes
            request.DATA
        except ParseError as error:
            return Response(
                'Invalid JSON - {0}'.format(error.message),
                status=status.HTTP_400_BAD_REQUEST
            )
        utils.store_the_json(request.DATA)
        return Response()
# parsers.py
import jsonschema
from rest_framework.exceptions import ParseError
from rest_framework.parsers import JSONParser

from . import schemas


class JSONSchemaParser(JSONParser):

    def parse(self, stream, media_type=None, parser_context=None):
        data = super(JSONSchemaParser, self).parse(stream, media_type,
                                                   parser_context)
        try:
            jsonschema.validate(data, schemas.json)
        except ValueError as error:
            raise ParseError(detail=error.message)
        else:
            return data
# urls.py
from django.conf.urls.defaults import url
from django.conf.urls import patterns

from . import views


urlpatterns = patterns(
    '',
    url(r'^/api/product/$', views.ProductView.as_view(), name='product_view'),
)

Content negotation

The `parse` method on each parser in `parser_classes` will get called only if the request’s “Content-Type” header has a value that matches the ‘media_type’ attribute on the parser, which means the JSON schema validation will not go ahead if no “Content-Type” header is set. If the schema validation must go ahead, I see a few options:

    • Assign `parser_classes = (PlainSchemaParser, JSONSchemaParser, XMLSchemaParser, YAMLSchemaParser, etc)` on ProductView and define the YAML, XML, etc schemas.
    • Force the view to use JSONSchemaParser parser regardless of if the client requests JSON, XML, etc.

To keep it simple this example will choose the second option by using custom content negotiation (which is pulled directly from DRF docs:

# negotiators.py

from rest_framework.negotiation import BaseContentNegotiation

class IgnoreClientContentNegotiation(BaseContentNegotiation):
    def select_parser(self, request, parsers):
        """
        Select the first parser in the `.parser_classes` list.
        """
        return parsers[0]

    def select_renderer(self, request, renderers, format_suffix):
        """
        Select the first renderer in the `.renderer_classes` list.
        """
        return (renderers[0], renderers[0].media_type)

Posting to the endpoint

lets define a simple webservice:

function createProduct(data){
    $.post('/api/product' data).
        done(function(resp){
            console.log('OK');
        }).
        fail(function(resp){
            var error = JSON.parse(xhr.responseText);
            console.log('error - ' + error.detail);
        });
}

createProduct({
    "name": "Foo",
    "price": 123,
    "tags": ["Bar", "Eek"],
    "stock": {
        "warehouse": 300,
        "retail": 20
    }
});
// OK

createProduct({
    "price": 123,
    "tags": ["Bar", "Eek"],
    "stock": {
        "warehouse": 300,
        "retail": 20
    }
});
// error - name property is required

createProduct({
    "price": 123,
    "tags": ["Bar", "Eek"],
    "stock": {
        "warehouse": 300,
        "retail": 20
    }
});
// error - price Number is less then the required minimum value

Maintenance

Word of caution: I find serializers much more maintainable than JSON schemas, so if you are 50/50 of whether to use JSON schema validation or a serializer then I suggest going for the serializer.

Check credentials using Django Rest Framework

This post will cover how to authenticate a user’s username and password using a Django Rest Framework endpoint. This functionality allows checking credentials without the need for refreshing the browser.

This is a follow up to my previous post, which covered how to create a User model DRF endpoint (allowing creating, listing, deleting users).

Create the endpoint

note my folder strucure is like so:

apps/
    accounts/
        urls.py
        api/
            views.py
            serializers.py
            authentication.py

In views.py we need to create the AuthView which we will call to check credentials:

from . import authentication, serializers  # see previous post[1] for user serializer.

class AuthView(APIView):
    authentication_classes = (authentication.QuietBasicAuthentication,)
    serializer_class = serializers.UserSerializer

    def post(self, request, *args, **kwargs):
        return Response(self.serializer_class(request.user).data)

[1] https://richardtier.com/2014/02/25/django-rest-framework-user-endpoint/

Then in authenticaiton.py we define our authenticator: We inherit DRF’s BasticAuthentication to check the HTTP_AUTHORIZATION header for correct username and password.

from rest_framework.authentication import BasicAuthentication

class QuietBasicAuthentication(BasicAuthentication):
    # disclaimer: once the user is logged in, this should NOT be used as a
    # substitute for SessionAuthentication, which uses the django session cookie,
    # rather it can check credentials before a session cookie has been granted.
    def authenticate_header(self, request):
        return 'xBasic realm="%s"' % self.www_authenticate_realm

Notice we’re also overriding BasicAuthentication’s authenticate_header method to prevent undesirable behaviour: by default with Basic authentication if user provides wrong credentials the browser prompts the user for their credentials again using a native dialogue box. Rather ugly and bad user experience. To avoid this we ensure the schema returns a custom value other than ‘Basic‘.

We of course need to define the url in urls.py:

from django.conf.urls import patterns, url

from api import views as api_views

urlpatterns = patterns(
    '',
    url(r'^api/auth/$',
        api_views.AuthView.as_view(),
        name='authenticate')
)

Using the endpoint

Now we can do some fun stuff – attempt to authenticate using the endpoint. We need to set the header of the ajax request. We can do this by hooking in with $.ajax’s beforeSend:


function checkCredentials(username, password){
    function setHeader(xhr) {
        // as per HTTP authentication spec [2], credentials must be
        // encoded in base64. Lets use window.btoa [3]
        xhr.setRequestHeader ("Authorization", "Basic " +
                               btoa(username + ':' password));
    }

    $.ajax({type: "POST",  url: "/api/auth/",  beforeSend: setHeader}).
        fail(function(resp){
            console.log('bad credentials.')
        }).
        done(function(resp){
            console.log('welcome ' + resp.email)
        });

[2] https://tools.ietf.org/html/rfc2617
[3] https://developer.mozilla.org/en-US/docs/Web/API/Window.btoa

and to finally use it:


// pass in bad credentials...
checkCredentials('AzureDiamond', 'password');
// ...prints 'bad credentials.'

// pass in good credentials...
checkCredentials('AzureDiamond', 'hunter2');
// ...prints 'welcome AzureDiamond@bash.org'

Security considerations

Only serve this endpoint over HTTPS, in the same way you should serve a conventional login page using HTTPS. We dont wan’t a man in the middle attack getting our auth header!

In a future post we cover how to use this functionality to have persistent login.

Django Rest Framework User Endpoint

DRF is an awesome tool for building web APIs the RESTful way: allowing you to interact with your database like so:

POST request to /api/articles with hdata payload to create new Article instance. PATCH request to /api/articles/1/ to partially update Article with pk of 1..save PUT request to /api/articles/1/ to completely replace Article with pk of 1. DELETE request to /api/articles/1/ to delete Article with pk of 1. GET request to /api/articles/1/ to retrieve Article with pk of 1. HEAD request to /api/articles/1/ to see if Article with pk of exists.

Gone are the days when we POST data like

POST request to /api/create_article with data payload POST request to /api/update_article with data payload POST request to /api/delete_article with data payload

The main advantage I see in RESTful is it gives us sane restrictions we must develop under and in doing so so helps organize our web apps – thereby avoid accidentally being “clever” and implementing a hard to maintain codebase. Since using DRF I found adding new features to my apps quicker, DRYer and with more readable code.

If you are a django user and interested in DRF, do pip install djangorestframework. For existing DRF users note make sure you have DRF >= 2.3.11, which now supports write_only_fields.

Defining the endpoint

Below we go through how to expose the User model to the web using a DRF endpoint to allow creating, updating, listing, deleting User objects. Note my folder structure is:

apps/
    accounts/
        urls.py
        api/
            views.py
            serializers.py
            permissions.py

We need to create a view that will serve list and detail view of users:

from django.contrib.auth.models import User
from rest_framework viewsets
from rest_framework.permissions import AllowAny

from .permissions import IsStaffOrTargetUser


class UserView(viewsets.ModelViewSet):
    serializer_class = UserSerializer
    model = User

    def get_permissions(self):
        # allow non-authenticated user to create via POST
        return (AllowAny() if self.request.method == 'POST'
                else IsStaffOrTargetUser()),

We need to be careful with permissions – we dont want users to be able to view other user objects if they are not staff members.

from rest_framework import permissions


class IsStaffOrTargetUser(permissions.BasePermission):
    def has_permission(self, request, view):
        # allow user to list all users if logged in user is staff
        return view.action == 'retrieve' or request.user.is_staff

    def has_object_permission(self, request, view, obj):
        # allow logged in user to view own details, allows staff to view all records
        return request.user.is_staff or obj == request.user

Next we define the serializer that will serialize Querysets and objects to JSON. We need to be careful on create of User object to handle passwords correctly, and on read not to serialize and return the password to the client.

from django.contrib.auth.models import User
from rest_framework import serializers


class UserSerializer(serializers.ModelSerializer):
    class Meta:
        model = User
        fields = ('password', 'first_name', 'last_name', 'email',)
        write_only_fields = ('password',)
        read_only_fields = ('is_staff', 'is_superuser', 'is_active', 'date_joined',)

    def restore_object(self, attrs, instance=None):
        # call set_password on user object. Without this
        # the password will be stored in plain text.
        user = super(UserSerializer, self).restore_object(attrs, instance)
        user.set_password(attrs['password'])
        return user

Now register the endpoint in the app’s urls.py:

from django.conf.urls import patterns, url, include
from rest_framework import routers

from . import api

router = routers.DefaultRouter()
router.register(r'accounts', api.views.UserView, 'list')

urlpatterns = patterns(
    '',
    url(r'^api/', include(router.urls)),
)


Using the endpoint

Below are examples of calling the endpoint using jQuery, showing the request and the data returned.

Create new user

var data = {username: 'new@user.com', password: '****', ...};
$.post('/api/accounts/', data).done(function(data){
    console.log(data);
});
{first_name: "New"
 last_name: "User",
 email: "new@user.com",
 id:4}

Update user details

var data = {email: 'new@user.co.uk'};
$.ajax({url: '/api/accounts/4', type: 'patch', data: data}).done(function(data){
    console.log(data);
});
{first_name: "New"
 last_name: "User",
 email: "new@user.co.uk",
 id:4}

List all users when logged in as staff

$.get('/api/accounts/').done(function(data){
    console.log(data);
});
[{first_name: "Richard"
  last_name: "Tier"
  email: "me@richardtier.com",
  id: 1},
{first_name: "John"
 last_name: "Doe",
 email: "Jon@Doe.com",
 id: 2},
{first_name: "Jane"
 last_name: "Doe",
 email: "jane@doe.com",
 id: 3}];

Retrieve own record when logged in as Jon@Doe.com

$.get('/api/accounts/2').done(function(data){
    console.log(data);
});
{first_name: "John"
 last_name: "Doe",
 email: "john@doe.com",
 id: 2}

Retrieve Jon@Doe.com’s record when NOT logged in as staff member and NOT user Jon@Doe.com

$.get('/api/accounts/1').fail(function(xhr){
    console.log(JSON.parse(xhr.responseText));
});
{detail: "You do not have permission to perform this action."}

In a follow up post we cover checking username and password using DRF.